# uname -a

Switch

Mot-clé -

Fil des billets

samedi 1 février 2014

Configure Postfix as standalone single-domain SMTP server using Unix users and PAM on Debian

Here is a quick setup to configure Postfix mail server, using existing Unix users.

The server will process mails for only one domain, and every existing user on the server will have a mail box inside his home directory.

Abstract

Postfix is an SMTP server, it receives incoming mail from other SMTP servers, and allows client to send mails to other SMTP servers.

What we don't want is an open mail relay. A mail relay is a SMTP server that take anything from any client, and send it to any SMTP server. We only want trusted users to send emails, to prevent anonymous clients from sending spam.

Incoming mail will be processed either if :

  • The domain name of one of the recipient matches the mail server domain, and the mail user name is also a system user (SMTP servers can send us incoming mails).
  • The client who tries to sends the mail has successfully authenticated.

Postfix authentication for clients can be handled by SASL. SASL is a standard protocol to provide an authentication layer. It can query PAM, or other authentication providers (MySQL users, etc).

Notes :

  • We will use PAM for Unix users SMTP authentication.
  • Unix users are stored in /etc/passwd and their passwords are stored in /etc/shadow.
  • Mails will be stored in the ~/Maildir/ of each users, in Maildir format.

Postfix : installation and configuration

Install Postfix : apt-get install postfix

Answer the questions during installation to setup your mail domain (the "example.com" in user@example.com).

Modify config files :

/etc/postfix/main.cf :

Configure TLS and Maildir :

# TLS parameters
smtpd_tls_key_file = /etc/ssl/private/ssl-cert-snakeoil.key
smtpd_tls_cert_file = /etc/ssl/certs/ssl-cert-snakeoil.pem
smtpd_tls_CAfile = /etc/ssl/certs/ca-certificates.crt
smtpd_use_tls=yes
smtpd_tls_session_cache_database = btree:${data_directory}/smtpd_scache
smtp_tls_session_cache_database = btree:${data_directory}/smtp_scache

# See /usr/share/doc/postfix/TLS_README.gz in the postfix-doc package for
# information on enabling SSL in the smtp client.

myhostname = mail.example.com
alias_maps = hash:/etc/aliases
alias_database = hash:/etc/aliases
myorigin = /etc/mailname
mydestination = example.com, localhost
mynetworks = 127.0.0.0/8 [::ffff:127.0.0.0]/104 [::1]/128
mailbox_size_limit = 0
recipient_delimiter = +

home_mailbox = Maildir/

# These are the "no relay" restrictions
smtpd_recipient_restrictions = permit_mynetworks permit_inet_interfaces permit_sasl_authenticated reject_unauth_destination

/etc/postfix/master.cf :

Enable TLS and alternate (submission) ports :

submission inet n       -       -       -       -       smtpd
  -o syslog_name=postfix/submission
  -o smtpd_tls_security_level=encrypt
  -o smtpd_sasl_auth_enable=yes
  -o smtpd_client_restrictions=permit_sasl_authenticated,reject
  -o milter_macro_daemon_name=ORIGINATING
smtps     inet  n       -       -       -       -       smtpd
  -o syslog_name=postfix/smtps
  -o smtpd_tls_wrappermode=yes
  -o smtpd_sasl_auth_enable=yes
  -o smtpd_client_restrictions=permit_sasl_authenticated,reject
  -o milter_macro_daemon_name=ORIGINATING

SASL : installation and configuration

SASL plugin for Postfix (Cyrus) is part of the dependencies of Postfix server.

Install SASL administration tools : apt-get install sasl2-bin

Enable SASL daemon at startup : edit /etc/default/saslauthd and switch START to yes.

Start it manually for the first time : service saslauthd start

Enable PAM authentication for SASL

Check that PAM is part of the MECHANISMS variable in /etc/default/saslauthd :

MECHANISMS="pam"

Create /etc/pam.d/smtp :

#
# /etc/pam.d/smtp - specify PAM SMTP behavior
#

@include common-auth
@include common-account
@include common-password
@include common-session

Enable SASL for Postfix

Add to /etc/postfix/main.cf :

smtpd_sasl_auth_enable = yes

Create /etc/postfix/sasl/smtpd.conf :

pwcheck_method: saslauthd
mech_list: PLAIN LOGIN

Adjust OPTIONS in /etc/default/saslauthd :

OPTIONS="-c -m /var/spool/postfix/var/run/saslauthd"

Add postfix user to sasl group :

adduser postfix sasl

Configuration check

Restart all services (postfix, salsauthd).

Try authentication using SASL : testsaslauthd -u user -p password

Try authentication from command line, without mail client : https://qmail.jms1.net/test-auth.shtml

Try SMTP reception by sending mail to your domain (your MX fields in domain has to be configured accordingly).

Sources

samedi 26 novembre 2011

Git push origin master : erreur 22

Petite note pour eux qui ont comme moi suivi les conseils et les exemples sur Internet pour installer un serveur Git avec WebDAV, il faut savoir que c’est comme avec Subversion, le serveur WebDAV aime pas trop les protocoles loufoques (https, as-t-on idée ?), et qu’il faut lui expliquer gentiment de faire de la substitution de protocole, pour le calmer.

Bref, comme j’ai cherché pendant trois heures, je vous livre la solution à cette erreur 22, il faut expliquer à Apache de remplacer https par http lorsqu’il passe à WebDAV.

RequestHeader edit Destination ^https http early

En principe ça ne change rien sur le fait que la connexion soit chiffrée, ça calme juste le module WebDAV derrière, pour qu’il retrouve ses petits. Autre petite astuce, pour éviter que un client un peu bête ne passe sur le http parce qu’il a pas compris :

SetEnv redirect-carefully 1

Et en exclusivité mondiale, je vous livre ma configuration, au cas où ça vous serait utile :

Pour Subversion :

        SetEnv redirect-carefully 1
        RequestHeader edit Destination ^https http early
        <Directory /path/to/repos/>
                AllowOverride None
                Options Indexes
                Order allow,deny
                Allow from all
        </Directory>

        <Location /repos>
                DAV svn
                SVNPath /path/to/repos/
                SetEnv redirect-carefully 1

                AuthType Basic
                Authname "Subversion repository"
                AuthUserFile /path/to/passwd
                AuthzSVNAccessFile /path/to/authz

                # Repository accessible en lecture sans identification
                <LimitExcept GET PROPFIND OPTIONS REPORT>
                        Require valid-user
                </LimitExcept>
        </Location>

Pour Git :

        SetEnv redirect-carefully 1
        RequestHeader edit Destination ^https http early

        Alias /repos /path/to/repos

        <Directory /path/to/repos>
                AllowOverride None
                Options Indexes MultiViews
                Order allow,deny
                Allow from all
        </Directory>

        <Location /repos>
                DAV on
                SetEnv redirect-carefully 1

                AuthType Basic
                Authname "Git repository"
                AuthUserFile /path/to/repos

                #Oui, normalement là il faudrait une gestion des groupes pour read/write mais bon...
                #<LimitExcept GET PROPFIND OPTIONS REPORT>
                        Require valid-user
                #</LimitExcept>
        </Location>

jeudi 11 novembre 2010

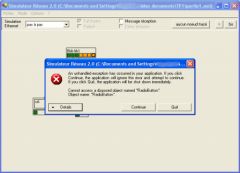
Lancer un programme .NET sous Ubuntu ? Trop facile !

windows-oups-1.png

J'ai été très étonné, j'ai réussi à lancer le simulateur réseau que l'on utilise en TP sous Windows directement sur mon Ubuntu, sans avoir à installer Wine. Comment ? Quelques incantations au dieu des programmes .NET : Mono.

En fait ça aurait marché tout seul si le programme ne voulait pas la version 1.0 de mono (moi j'ai la 2.0, je suis moderne ;) ), il me disait :

The assembly mscorlib.dll was not found or could not be loaded.
It should have been installed in the `/usr/lib/mono/1.0/mscorlib.dll' directory.

J'ai donc installé Mono 1.0, en installant winforms1.0-cil, qui contient les dépendances nécessaires (oui bon avant de le savoir j'ai tenté des trafics avec des ln -s /usr/lib/mono/2.0/ /usr/lib/mono/1.0/ mais ça plante assez quand c'est installé correctement, on va pas en rajouter). J'ai donc fait :

sudo apt-get install libmono-winforms1.0-cil

Et là miracle, le programme se lance ! Bon il y a des petits problèmes, comme d'habitude, au niveau du placement des composants cliquables, les accents qui ne fonctionnent pas, mais le programme tourne, et ça c'est chouette !

jeudi 14 octobre 2010

Installer Teeworlds depuis les sources

La dernière version de Teeworlds se faisant désirer, voici comment compiler pour linux depuis les sources :

Vérification des dépendances

  • libx11-dev
  • libsdl-dev
  • libglu-dev
  • libgl-dev
  • libasound-dev

Clone du repos

  • git clone http://github.com/oy/teeworlds.git

Récupération de bam

  • wget http://github.com/downloads/matricks/bam/bam-0.4.0.tar.gz

Extraction et Compilation de bam

  • tar -xzf bam-0.4.0.tar.gz
  • cd bam-0.4.0/
  • ./make_unix.sh

Compilation de Teeworlds

  • cd ../teeworlds
  • ../bam-0.0.4/bam release

mercredi 14 juillet 2010

Insérer les articles de Dotclear sur son site

C'est quelque chose qui existe probablement déjà, mais comme je l'ai développé pour mon site, je vous propose ma solution, petite astuce à l'échelle des tutos Dotclear existants.

Lire la suite...

- page 1 de 2